Saturday, September 29, 2012

National Cardmaking Day

Hi all!

 Did you know that October 6th, one week from today, is world card making day?  Well, it sure is!  And we will have a little surprise for you!  Don't even ask - that is all the hint you will get from me!  So make sure you check back on October 6th for the fun news!

And because I do not want you to have a naked (well without a picture) post... here is a little eye candy.


Thanks for visiting!
Laura
xoxo

Friday, September 28, 2012

Sketch-y Friday

Hello there and happy Friday!

Here is your Friday sketch .....


 And this week, we have Elaine creating a sample for you!


 Now it's your turn!  Play along and share it with us!

Here is a run down of the rules.  We are offering a little prize to one lucky scrapper that participates in at least 2 of this month's 4 sketches.  Just link up your creations at the bottom of each Sketch-y Friday post, all qualifying scrappers will be entered into a random draw for a prize.  Only one entry per sketch please.  You have until Sunday, September 30th at midnight to participate in any of September's sketch challenges, each linkup tool will remain open until that date!  But remember, you must play along with 2 different sketches for a chance to win!  (International participants may be required to pay some shipping fees. ) Who knows, maybe we will run this challenge month after month if you love it and keep playing along!

Thanks for visiting!
Laura
xoxo


Thursday, September 27, 2012

Inspiration on Thursday

Hi there!

Today is inspiration day and Elaine has created two beautiful layouts to share with you.


 Love this colour combo and that amazing photo!
This line was a huge hit when it was in our store and Elaine did justice to it creating this layout, featuring sweet photos of her baby girl!


What are you creating this week? Leave us a comment with your blog address (or other link) ... we will be sure to stop by and leave you some love.  Also, don't forget you can email anything you wish to share, to me here, to have them shown off on our Thursday blog posts.

Thanks for visiting!
Laura
xoxo

Wednesday, September 26, 2012

September Colour Challenge Highlights

Hello!

Our September colour challenge drew to a close last night.  I wanted to show you a couple of our favourite layouts......

from Andrea E, we love the use of 4 photos on a single page layout, also that there is lots of colour while still being a clean looking layout!

from Cheryl O, I really love how the colour sin the month's challenge mimic the colours in these beautiful sunset photos.
And now for this month's colour Challenge winner, drawn via Random Integer.......

Random Integer Generator

Here are your random numbers:
1
Timestamp: 2012-09-26 03:26:17 UTC

... so that means Andrea E. is our winner!  Congratulations Andrea, you can email us here to claim your prize!


Thanks to everyone that played along.  We hope you join us again for October's Colour Challenge (any guesses on the colours for October?), which will be released next Tuesday!


I will be back shortly with this week's tutorial.

Thanks for visiting!
Laura
xoxo

Chipboard Embossing Tutorial

Hi there!

Happy Wednesday!  I have a fun and easy tutorial up for yo today!  A little something to get you some extra mileage out of your chipboard shapes and your Cuttlebug ( or other die cutting machine).

Before you go ahead and alter and/or adhere those sweet chipboard shapes from your stash, to your next project.  Have a look at what you can do with them first....

 I started with a package of chipboard hearts.
 Using my Cuttlebug I layered a 'B' plate, my embossing Polymer mat, a sheet of cardstock (I chose white but you can use any colour) and then I placed the hearts in a pattern (you can totally go random if that is your preference).  Next add a second 'B' plate and run the 'sandwich' through your machine.
 This is what you end up with..... cool right?
A little close up.   And the bonus part is the chipboard hearts are un-harmed so I can use them again like this or as an embellishment to my next project, just as I normally would.

 This is the card I made using this technique.

A couple of close ups of my card for you.

Told you it was easy!  Why don't you give it a try!

Thanks for visiting!
Laura
xoxo

Tuesday, September 25, 2012

Summer Friends - another reveal

Hi there!

Do you remember way back on the first of September?  The day I promised that I would have another project to share using my DT kit.... well, I am almost embarrassed to admit that I finally finished it!  It was just one of those things that just kept getting put on the back burned while life happened.

Any enough excuses, have a peek....

 Still loving these fun colours, perfect for summer days/  Yup, you can definitely use pink for boys... what the heck!  I like it, it's my album - hehe!

 Got a little creative with my alphas - the package was slim pickings at this point, but mixing upper and lower case, as well as throwing in a '3' for and 'e' got the job done!
 I am still in love with these MME swags, they are so pretty and fun.  they are actually pretty long but come in nice small packaging which makes for easy storage.
Some washi tape, and some butterflies finish it off! Oh, and we can't forget the twine... another love of mine.

Thanks for visiting!
Laura
xoxo

Saturday, September 22, 2012

Scrappink Crop for the Cure!

Hello there!

Breast Cancer has touched most of our families in some way.   Let's work and play together to raise funds to help find  a cure!


Together we can help make a difference!

Here are the details on this year's event:


Annual ScrapPink Fundraiser Crop 
September 29th from 8am-6pm
at THE SALVATION ARMY CHURCH
Brantford, ON
$45 +HST
*includes breakfast, lunch, snacks and cold beverages,
great loot bags, and prizes. 
We will also be selling raffle tickets for great door prizes and have many wonderful items for sale at our onsite store!!

You can find more details on our 'Upcoming Crops' page here.

Last year you helped us raise $1500.00 towards a cure for Breast Cancer, we are hoping you will help us do it all over again this year.


Spaces must be reserved on line by visiting our online store here
or via email here.

We hope to see you there!
Elaine, Anita, Eileen and Laura
xoxo

Friday, September 21, 2012

Sketch-y Friday

Hello there and happy Friday!

Here is your Friday sketch .....


 And here is Eileen's amazing take on it....


  Now it's your turn!  Play along and share it with us!
Here is a run down of the rules.  We are offering a little prize to one lucky scrapper that participates in at least 2 of this month's 4 sketches.  Just link up your creations at the bottom of each Sketch-y Friday post, all qualifying scrappers will be entered into a random draw for a prize.  Only one entry per sketch please.  You have until Sunday, September 30th at midnight to participate in any of September's sketch challenges, each linkup tool will remain open until that date!  But remember, you must play along with 2 different sketches for a chance to win!  (International participants may be required to pay some shipping fees. ) Who knows, maybe we will run this challenge month after month if you love it and keep playing along!

Thanks for visiting!
Laura
xoxo


Thursday, September 20, 2012

Inspiration on Thursday

Hi there!

Today is inspiration day and Elaine has created two beautiful layouts to share with you. 

 I love the use of pastels with this photo, as the girls are laying on a bed of white.  The brown glittery alphas really pop and draw attention to the photo.
If you ever look at one of your own layouts and wonder what it is missing, the answer is probably texture.  Elaine has added wood, twine and bling to amp up her layout.

What are you creating this week? Leave us a comment with your blog address (or other link) ... we will be sure to stop by and leave you some love.  Also, don't forget you can email anything you wish to share, to me here, to have them shown off on our Thursday blog posts.

Thanks for visiting!
Laura
xoxo

Wednesday, September 19, 2012

Fall Leaves - Tutorial

Hi there!

Happy hump day!  I have a pretty easy tutorial to share with you today.  And while the project itself is fairly simple, I have a couple of tips / tricks that I used to create it just the way I wanted and thought they may be helpful to you, too!

Here is a little peak at the finished product.
Well grab a coffee or a tea and get ready for the step by step!
 First, I die cut a bushel of leaves (heehee) using my Tim Holtz die and some text paper (because I have a passion for text paper), and because I wanted to play with my distress inks.   Of course, you can choose papers that suit you and you can decide to ink or not.
 Then I set to distressing each leaf.  Now here is TIP #1 - if you are like me and have yet to invest in one of those fancy wipe-able ink / paint mats , then grab your waxed paper.  The ink moves around really nicely on it, making it really easy to distress your leaves.  Bonus - clean up is as simple as tossing the waxed paper into the trash. 
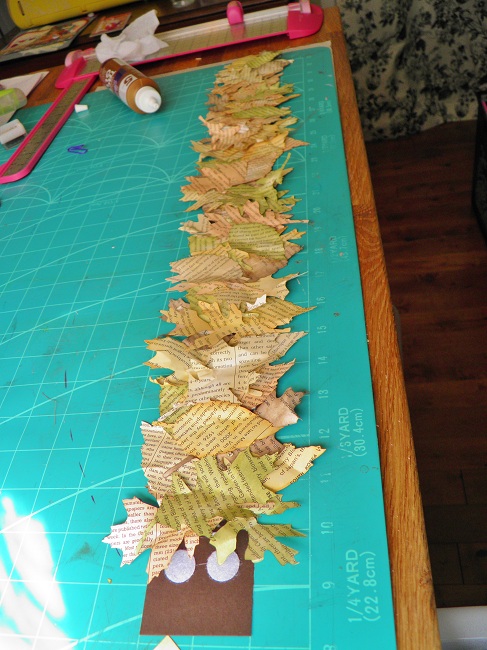
 So here are all of my distressed leaves, I used green, orange, and 3 different browns.  Sort of like the different stages you would see in fall.
 Next step, give them all a little crumple.
 Now for the band, I have cut 3 strips of 2 inch brown cardstock.  Be sure to use a colour you like or that coordinates as you will be able to see it if you are using a glass vessel like I am.
 Now glue all 3 together length-wise.  I have added a couple of paperclips temporarily so that I could still play with this band while it was drying.
 This is my vessel of choice (before).
 Now wrap the cardstock band around your vessel and trim off excess, so that you have some overlap.
 TIP #2, I decided to make my band removable ( so I can clean my vessel and so that I can reuse the band again next year, should I choose to). I have these little velcro tabs in my stash (picked up from the dollar store)  I did add some extra liquid glue to them to make sure they really stick as I will want my band pretty tight.  Make sure you put one side of the velcro on the back of the band and the opposite part of the velcro on the front of the band.
 Now for the fun part - adding the leaves.  I used liquid glue, adding a few inches at a time.
 Start laying down your leaves in a 'planned random' fashion.  You know, so that you do not have all of one colour clumped together but also so that it doesn't look like you tried too hard.
 Continue on until your band is full.  you can see that I had a few little gaps hear and there and thankfully I had a few leaves left, so I was able to cover the gaps.
 Don't forget to leave your velcor uncovered.
 Some tiny gemstones for sparkle and fun.
 Now for the focal point, really anything goes.  I chose this large burlap flower that I had been hoarding for the perfect project and layered it up with this pretty yellow flower.  I also added some strands of twine.
 The finished product!
 And a little close up for you!

So what do you think, not too hard right?  I love mine and have it on display where I can see it often.  A simple nod to fall, which I still am not ready for, despite it being only a few days away.  From start to finish, including the planning, cutting, inking and drying - this little baby only took about an hour.  Totally worth it in my books!

Thanks for visiting!
Laura
xoxo

Friday, September 14, 2012

Sketch-y Friday

Hello there and happy Friday!

Can you believe we are just about halfway through September?  I think before we know it it will be Halloween, eeek!

Here is your Friday sketch .....

 
And here is Eileen's take on it.....

This is just too beautiful, the colours are incredible and that washi tape is just so fun!

 Now it's your turn!  Play along and share it with us!
Here is a run down of the rules.  We are offering a little prize to one lucky scrapper that participates in at least 2 of this month's 4 sketches.  Just link up your creations at the bottom of each Sketch-y Friday post, all qualifying scrappers will be entered into a random draw for a prize.  Only one entry per sketch please.  You have until Sunday, September 30th at midnight to participate in any of September's sketch challenges, each linkup tool will remain open until that date!  But remember, you must play along with 2 different sketches for a chance to win!  (International participants may be required to pay some shipping fees. ) Who knows, maybe we will run this challenge month after month if you love it and keep playing along!

Thanks for visiting!
Laura
xoxo


Thursday, September 13, 2012

Inspiration on Thursday

Hello there!

As we are finalizing our preparations for our annual ScrapPink crop (you can find all of the details here) , it seems only fitting that our inspiration for today honors that very event!

 A huge thank you to Sandy Ross for submitting this beautiful and timely layout documenting her lovely family at our last ScrapPink event!

Sandy your layout is wonderful, I love all of the glittery accents, the Breast Cancer awareness ribbon, and that your papers and elements are the perfect shades of pink for the event and to coordinate with your family!

On the right hand side of our blog there is a, "I ScrapMuch?'d and got featured" badge for you to post on your blog!  Just copy and paste the code in the box  below the badge and add it to a new HTML gadget in your blog's layout screen.! 

What is everyone else creating this week? Leave us a comment with your blog address (or other link) ... we will be sure to stop by and leave you some love.  Also, don't forget you can email anything you wish to share, to me here, to have them shown off on our Thursday blog posts, and get your own "I ScrapMuch?'d and got featured" badge!

Thanks for visiting!
Laura
xoxo

Wednesday, September 12, 2012

Playing with Digital Stamps

Hello there!

Happy Wednesday to you!  Today's tutorial may be a little outside of the box for some of our followers but I think you will like it and it just may turn you on to something new.  So don't go run and hide because I mentioned digital stamps.   They are really fun, easy, versatile and cheap.  Go ahead grab a coffee or a tea, I will wait!

You will notice a really varied quality in the art work of digital stamps, and sometimes the free ones can be a little meh.  But some are amazing.  Either way there is something for everyone and they are just perfect for those of us beginning with digital stamps.  As you get more experienced you will find yourself purchasing a few here or there. 

First off let me tell you why I love digital stamps, or digis, ....

-you usually purchase them individually, which means if you are paying for them you only buy what you need or want
-you can save them to your computer and use them over and over again, there are no restrictions
-they do not take up valuable storage space
-you can color them with a variety of mediums including your computer (and did you know you can buy some digis pre-coloured too)
-you do not need a special printer
-if you have little kiddies, you can print them out as coloring pages
-they take seconds to download and you can play with them immediately - you do not even need to get out of your jammies
-digis are a great way to personalize cards for your recipients

What you shouldn't do....

-share or give away digis, they are copyrighted (yes even the free ones) share the websites not the downloads
-that's it for the don'ts!

So let's get started...

Once you find a digital stamp you like, check out this site Dearie Dolls, I like it because they are cute, always free and come in both coloured and not coloured!  So if you go to the website, the screen will look like this ....

you can click on any of my images to enlarge them
.... you will then right click on the image and click 'save image as'  then choose a location on your computer to save it too.   I suggest creating a folder on your computer called "Digital Stamps" then you will have them all in one place.  When you save an image, usually the name of the image will be generated as the file name, I suggest modifying it to also incorporate the name of the website or artist for future reference.

Now for some fun ....

Now find the file in your computer and right click on the little thumbnail of the digi and choose "copy".  (This is a screen shot of my Dearie Dolls file on my computer.)

Now open up your 'Word" program and paste the image in there  (You will notice that I have 'x'd" out the images I am featuring, you can go and download them free for yourself.)

Now once the image is pasted onto a "Word Document" right click on it, you will see a resizing box pop up.... for most digis you can make it as big or as small as you like.  You only need to be mindful of where you will be using it, such as the front of a card.
And you can copy and paste your newly resized image, so that you can print several on one sheet.  I like to print a few of each one, partly to have on hand and partly to be prepared in case I make a mistake colouring.  I also like to leave room above and below as well as on either side in case I want to use a die to cut the image out into a specific shape for my card.  But you can also paste several different images onto one 'Word Document" to save on paper and printing time.

Now comes more fun!  How do you want to colour these?  Are you coloring with Copics or another 'wet' medium?  You will want to print the images onto paper appropriate for your colouring (ie. Copic paper) AND you will need to quickly heat set the images with your embossing gun.  Being careful not to burn the images, it only takes seconds.  If you are printing copies for your kiddies to colour you can print onto regular printer paper.  If you want to do some paper piecing you can print onto patterned paper that has been trimmed down to 8.5 x 11.  No heat setting required.

You can also use your computer's "Paint" program to colour them, by copying and pasting the image onto a blank "Paint" page, resize it to your desired size.....

....then use your paint bucket to drop colour into each area.  You can create some cool effects depending on the tool you choose to colour with.  Now print onto white card stock.

Another tip....  I like to pick out the patterned paper that I am going to use on my project, from my favourite scrappy store (you know which one!),  before I start colouring, this way I can colour the image to coordinate with my papers.  Oh and if you post a project with a digi on it onto your blog, remember to give the artist credit.

I hope I didn't lose you along the way!  Do I talk to much?  Did you learn something?  Will you try it?  If you do, leave me a comment to where your project is posted... I will come visit and leave you some love!

Thanks for visiting!
Laura
xoxo


ps. One more quick thing - as if this post isn't long enough!  Did you  notice we have a little treat for you, a new badge in our sidebar for you to add to your blogs!  As well, as newbadges for our challenge winners and one for anyone who has been or will be featured on our blog!  Fun!